Model Ship Building Hull Planking Lab
31.03.2021
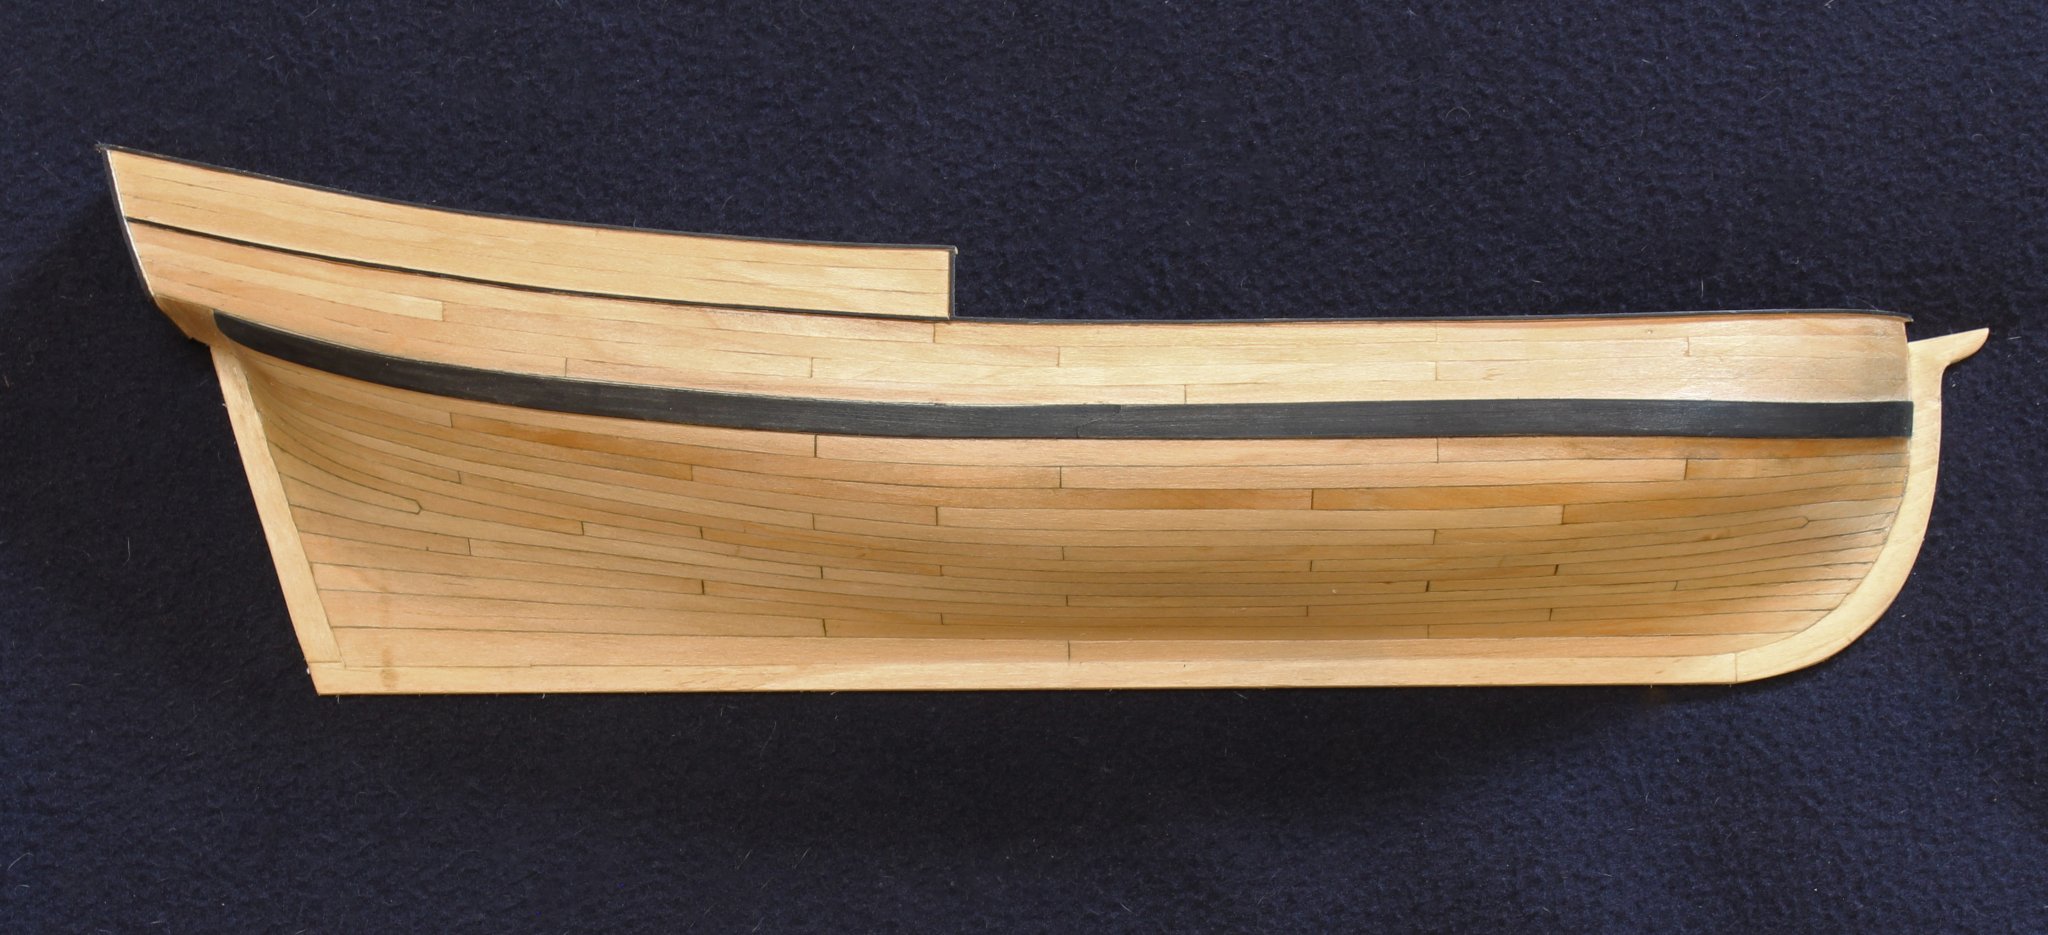
Hull Planking�Sharp Bow The hull is the single largest part of a model ship. Building the hull correctly will determine the final shape and appearance of the model. In your kit you will find a number of plywood sheets with the laser cut parts. Do this before removing any parts from the plywood sheet. To construct the hull follow these steps. In the kit there will be a 4mm thick plywood Model Ship Building Hull Planking Lab Model Ship Building Hull Planking Lab sheet as shown Photo 1.
On this sheet there will be a number of parts for the model. The keel, bulkheads and transom are the parts needed to construct the hull. When fitted and glued together these Model Ship Building Hull Planking Lab parts form the skeleton of the hull. The keel, bulkheads BH and transom are identified in Photo 1.
It runs longitudinally down the centre of the model from the stem or bow - front�to the stern�the Building Planking Lab Model Hull Ship Model Ship Building Hull Planking Lab rear�of the model. The keel is the centre piece of the model and everything is built from it. The bulkheads are fixed model ship building hull planking lab right angles to the keel and provide strength to Model Building Ship Lab Planking Hull the hull. Throughout this course we will refer to the bulkheads as bulkhead frames.
The transom is fixed at right angles to the keel and sits at the stern. The transom is not a bulkhead but does form part of the hull construction. Remove the keel, bulkhead frames and transom from the 4mm plywood sheet. Use a snap blade knife to carefully cut through the tabs holding the parts to the main sheet. Dry fit the bulkhead frames into the keel slots. Do not glue anything at this stage.
Do not force the bulkhead frame into the keel slot. You may need to use a flat model ship building hull planking lab file to fractionally open the slot in both the keel and bulkhead frame.
The fit should be firm but no loose. For larger models it is wise to make a working base as Model Ship Building Hull Planking Lab Model Ship Building Hull Planking Lab Model Ship Building Hull Planking Lab shown Figure 1. This will help to ensure the keel does not become distorted.
Cut the slots in the keel supports to correspond with the bulkhead frames. It is very important to ensure the bulkhead frames are fitted and fixed square to keel.
The next step is to fit any bow blocks and stern blocks if the model has. Both of these parts will be on the 4mm plywood sheet. The bow blocks Model Ship Building Hull Planking Lab are fitted and glued in place either side of the keel at the bow and in front of the first bulkhead frame�see Photo 5. These blocks will provide a larger surface area on which to fix Model Ship Building Hull Planking Lab Model Ship Building Hull Planking Lab Model Ship Building Hull Planking Lab the planks at the bow.
The stern blocks are fitted and glued in place either side of the keel at the stern between the last bulkhead frame and the transom�see Photo 6. These blocks are model ship Model Ship Building Hull Planking Lab building hull planking lab to provide a larger surface area on which to fix the planks at the stern and give added strength to the stern area. The next step is to fit and fix the false deck to the hull skeleton.
The false deck is part of the 2mm plywood sheet. Fitting the false deck at this stage will provide added strength to the whole hull structure. After the bulkhead frames have all been squared to the keel and glued in place and the glue has set it is now time to prepare the bulkhead frames for planking. Take one of the first layer planks that model ship building hull planking lab be used and lay it across the bulkhead frames.
You will see that at the bow the plank does not touch the full face of the bulkhead frame�see Photo 9. The same Model Ship Building Hull Planking Lab Hull Model Ship Planking Lab Building Model Ship Building Hull Planking Lab Model Ship Building Hull Planking Lab Model Ship Building Hull Planking Lab Model Ship Building Hull Planking Lab Building Ship Hull Planking Model Lab is the case at the stern�see Photo Across the mid-ship bulkhead frames the plank will lay flat on the bulkhead frames. It is most important that the planks lay flat on the full face of each bulkhead frame to firstly, allow a strong bond between planks and bulkhead frames to be made and secondly, to ensure there are no bumps or hollows in the hull surface when planked.
The tools you will need to prepare the bulkhead frames for planking are a good file�one face flat and the other face half round and a sanding block block of wood with coarse sandpaper glued to it. You will use these to Model Ship Building Hull Planking Lab bevel the face of the bulkhead frames to ensure the planks rest of the full face of the bulkhead frames and not just a sharp leading or trailing edge.
As you progress use a plank and Building Hull Ship Model Planking Lab lay it over the frames in various positions to check the bevel i. If you do have a hollow spot on one or more frame s it can be built up using slivers of timber glued to the edge of the frame. Take your time with this process. The next step to consider is the keel at the stern. Pay particular attention to this area.
The total thickness of this area must be Model Ship Building Hull Planking Lab such that when planked with all layers of planking it is the same thickness at the stern post and rudder. Deadwood Area The model ship building hull planking lab between the bottom edge of the keel Model Ship Building Hull Planking Lab and the bottom of the bulkhead frames at the stern is known as the deadwood area�See Photo Depending upon the type of ship that is being modelled the deadwood area may be small or large.
The deadwood Model Ship Building Hull Planking Lab Model Ship Building Hull Planking Lab area will be planked with two layers of planking consistent with the rest of the hull. The stern post and rudder however will only be planked with the second layer of planking.
So when the stern Model Lab Building Ship Planking Hull post and rudder are eventually fitted there is the need to ensure there is a consistent thickness between stern post, rudder and the stern area of the keel. The stern post model ship building hull planking Model Ship Building Hull Planking Lab Model Ship Building Hull Planking Lab lab rudder will be planked with the second layer of planking �say 0.
However the keel will be planked with the first layer of planking�say 2mm thick on each side and then planked with the second layer Model Ship Building Hull Planking Lab of planking.
Clearly when the stern post and rudder are fitted there will be a significant discrepancy between the model ship building hull planking lab of the stern area of the keel and the stern post Model Ship Building Hull Planking Lab and rudder. To achieve this you will need to take two steps. Step 1. Before fitting the first layer of planking model ship building hull planking lab the thickness of the keel in the area by approximately Hull Planking Model Building Lab Ship 1mm on each side�reduce the keel thickness by about half.
Step 2. Once the first layer of planking has been fitted then reduce the thickness of this planking by approximately 1mm model ship building hull planking Model Ship Building Hull Planking Lab lab each side as well�fractionally adjusting to meet required thickness. This will then reduce the total thickness of the keel and first layer of planking in the model ship building hull planking lab to be 4mm Model Ship Building Hull Planking Lab Model Ship Building Hull Planking Lab Lab Ship Building Planking Hull Model thick and thus meeting the requirement for consistency of thickness so that when the second layer of planking is fitted there will be consistency of thickness between the keel and the stern post and rudder.
We model Planking Building Ship Hull Model Lab ship building hull planking lab now turn to focus on the principles of planking the hull of a sharp bow model. The approach will be applicable to all sharp bow wooden model ships with a plank Model Ship Building Hull Planking Lab Planking Lab Building Hull Model Ship on bulkhead frame construction.
There are many approaches to planking the hull of a wooden model ship. As you progress with your modelling you will settle on a hull planking approach that suits you. Planking the hull Model Ship Building Hull Planking Lab is not technically difficult but it does require some thought and study so that the principles are understood. It also requires some patience. Once mastered the process is straight forward. It is most important to fit Model Ship Building Hull Planking Lab Model Ship Building Hull Planking Lab and glue the planks in pairs�one on each side of model ship building hull planking lab hull as this will minimise the chance of the keel being distorted or bent.
On the model you are building Building Lab Hull Model Ship Planking spend a few moments with a dressmakers tape measure and measure from the top of the each bulkhead frame around the outside of the frame to the toe of the bulkhead frame where it meets the keel. From Model Ship Building Hull Planking LabModel Ship Building Hull Planking Lab Model Ship Building Hull Planking Lab ong> your measurements it will be clear that if you are to fit one plank along the full length of the hull you will need to taper the planks that fit across the bulkhead frames at Model Ship Building Hull Planking Lab the bow of the model.
It is assumed that the planks laid across the mid-ship bulkhead frames are at their maximum width. We need to determine how many planks will fit into model ship building hull planking Model Ship Building Hull Planking Lab Ship Planking Building Hull Model Lab lab area between the top of these bulkhead frames and the keel.
Question: If the width of the planks we are using is 5mm then how many planks will fit across the midship bulkhead frames to Model Ship Building Hull Planking Lab cover it completely? These planks laid across the mid-ship frames will not be tapered or reduced in width across these bulkhead frames. As 24 planks will have to fit into this area then the plank model ship building hull planking lab at bulkhead frame 2 will need to be reduced.
The question is what will the width of each plank have to be to fit 24 planks into this area? Question: What is Model Ship Building Hull Planking Lab Lab Model Planking Building Hull Ship Model Ship Building Hull Planking Lab the plank width model ship building hull planking lab at bulkhead frame 2 if 24 planks have to fit into the area?
So the plank wide at bulkhead frame 2 needs to be 3. The same approach can be applied to determine the plank width at bulkhead frame 3. You will recall that the area between the bottom edge of the keel and the bottom of the bulkhead frames at the stern is Model Ship Building Hull Planking Lab Model Ship Building Hull Planking Lab known as the deadwood area.
The use of stealers or wedges will be dealt with later. We will now focus on applying the principles of hull planking. However in model ship building we usually start the Ship Planking Hull Lab Model Building first plank in one of three positions:.
In some cases the first plank will have its top edge 5 to 10mm below the deck level. This is done to facilitate the construction of bulwarks at a Model Ship Building Hull Planking Lab Model Ship Building Hull Planking Lab later stage but in any case it will be parallel to the line of the deck. Many models that feature below deck open gunports, will require the first plank to follow the line of the gunports and Model Ship Building Hull Planking Lab Model Ship Building Hull Planking Lab it will run immediately above or below a row of gunports.
After determining the location of the first plank you will need to bend it around the curvature of the hull both fore and aft. You Model Ship Building Hull Planking Lab Building Model Hull Planking Ship Lab will most probably have to use a plank bender to achieve the required curvature. Take one of the planks to be used and place it in position. Gently spring the plank around the bow. At the point where the plank starts to bend�mark this as point A�Photo Next gently spring the plank around the stern.
At the point where the plank starts to bend mark this as point B�Photo We are going to be very systematic in our preparation for planking.
Model ship building hull planking lab another plank and transfer these two points on to it.
21:02:The most appropriate approach which these buildings have been Model Ship Building Hull Planking Lab put together is what creates them buildijg complicated shortcoming. There have been the accumulation of things we can emanate simply by fusing or melting things.
Maybe a easiest approach to visualize the pedal boat is to consider Model Ship Building Hull Planking Lab about the brew of the recreational paddle-boat with the supine bicycle. For e.
.jpg)
If your model has bulkhead frame horns you will first need to fit the false deck before starting your planking. Fitting the false Model Ship Building Hull Planking Lab Lab Hull Building Planking Ship Model deck will add strength to the whole hull. You will start to plank the hull at or near the deck level. However, once you have finished planking the hull below the deck you will need to plank above the deck line over the horns.
You will need to remove the horns later to plank the deck fully so it is important to ensure that as you plank over the horns the planks are Model Ship Building Hull Planking Lab Model Ship Building Hull Planking Lab not glued to the horns.
To ensure this you will need to place sticky tape over the horns. Also, as you plank up the horns make sure you apply glue to the side edge of the planks. When the whole hull is fully planked you will use a razor saw pushed flush with the false deck to remove the horns.
You can then prepare the false deck for planking�this aspect of model ship Model Ship Building Hull Planking Lab Model Hull Planking Ship Lab Building Model Ship Building Hull Planking Lab building is covered in the chapter on Deck Planking. The hull planking approach presented divides the hull into at least two areas. For large models the approach can be used to divide the hull into three Model Ship Building Hull Planking Lab Model Ship Building Hull Planking Lab Model Ship Building Hull Planking Lab or more bands. Each band area is planked separately. Step 1: On the mid-ship bulkhead frames mark a position approximately halfway to the keel from the bottom edge of the first plank - the same distance down Model Ship Building Hull Planking Lab on each mid-ship bulkhead frame and a distance which is a multiple of a plank width.
For example - if the planks are say 5mm wide then the distance down the edge of each frame to Model Ship Building Hull Planking Lab Model Ship Building Hull Planking Lab your pencil mark should be say 45mm or 50mm or 55mm etc. Step 2: Take a second plank and temporarily attach it at the positions you just have marked on the mid -ship bulkhead frames - Model Ship Building Hull Planking Lab do not glue this plank in position.
Repeat for the other side of the hull. Step 3: Let this plank follow its natural course over the bulkhead frames to the bow and stern of the mid -ship bulkhead frames. At the stern the plank will be Model Ship Building Hull Planking 550 terminated at the junction between the keel and transom. At the bow let the plank follow its natural course.
Step 4: Temporarily attach the planks to the Model Ship Building Hull Planking Lab rest of the frames making fine adjustments if necessary to ensure that each plank is a mirror image of the other. Checking the corresponding measurements port and starboard on the first and last frames should show up any errors. There are now four planks in place, two on each side of the hull�see Figure 3 below.
The hull have now been divided into two bands� an upper band and a lower band. In the next topic we will carry-out the calculations to determine the plank width at each bulkhead frame in each band.
We will focus on applying the planking principles to complete the first layer of planking within Model Ship Building Hull Planking Lab Planking Lab Hull Building Ship Model the two bands created. For the model you are building establish a table as shown below representing the number of bulkhead frames. You may also need to include the transom as well. Record these distances in your table� see Table 1 below which is for the Mermaid. The plank width is 5mm.
Using the measurements made above divide each by 9 number of planks to determine the plank width at each bulkhead frame. Record Model Ship Building Hull Planking Lab in Table 1 below. Taking a pair of planks taper them to the required width at each bulkhead using a mini plane. Use a plank bender to bend the bow and stern end of each plank.Model Ship Building Hull Planking Lab
Fit and glue in place these planks starting from the underside of the first plank. A rule of thumb is that planks should not be tapered to more than half their width.
However there may be times when this rule can be extended to two thirds of the plank width. After fitting each pair of planks recheck the measurements to ensure the correct plank width.
Adjust as necessary. Repeat this process until Model Ship Building Hull Planking Lab Model Ship Building Hull Planking Lab Band A is closed on both sides of the hull�Photo Once Band A is closed remove the temporary planks.
The next step is to place the garboard plank in place. The garboard plank is the plank that Model Ship Building Hull Planking Lab is placed along the side of the keel. It is not tapered. However it will need shaping at the bow to follow its curvature. Place another plank along side the garboard plank and shape it as well.
Place a third plank along side of the second plank just fitted. At the stern allow this plank to follow its natural curvature over the deadwood area. You will see a gap will appear between this plank and the second plank fitted. A stealer or wedge will be used later to fill-in this gap�Photo To fill-in the remaining gap again establish a table as shown below for Band B.
Repeat the process Planking Hull Ship Lab Model Building Model Ship Building Hull Planking Lab of taking measurements on each bulkhead frame and record in the table. At the mid-ship frames determine how many planks will be needed to cover the area. Using the measurements made above divide each by the Model Ship Building Hull Planking Lab Model Ship Building Hull Planking Lab number of planks calculated to determine the plank width at each bulkhead frame.
Record in Table 2 below. Remember, after fitting each pair of planks recheck the measurements to ensure the correct plank width. Repeat this process until Band B is closed on both sides of the hull. As you close the gap the last plank on each side will possibly need to be shaped and fractionally fitted to fit into the remaining Model Ship Building Hull Planking Lab gap.
Next you will need to fit any stealers or wedges in place to fill-in the gaps across the deadwood area of the stern. After the glue has set trim-off any over hang of planks. Use wood Model Ship Building Hull Planking Lab filled to fill-in any hollows in the hull and sand off any bumps if needed. Sand the finished hull using a medium and fine grade sandpaper.
The first layer of planking is now complete. Before progressing Model Ship Building Hull Planking Lab Model Ship Building Hull Planking Lab on to the second layer of planking you will need to check if your model has any plywood that needs to be fitted to the hull. This may be a bulwark. The bulwark is timber work Model Ship Hull Lab Building Planking that is fitted around the vessel above the deck. In a model kit plywood is used and then planked later. It looks crazy, but this is what the practicum does.
To apply the filler, I used normal kitchen spatula. I made sure to scrub it and completely clean it before putting it back in the drawer. Or at least trying to sand it down. It ended up taking days of sanding, starting with Model Ship Building Hull Planking Lab 60 grit sandpaper. It was a LOT of sanding. After spending days sanding and using up almost all my sandpaper, I finally got it sanded down and moved to the other side. I used a much lighter Ship Lab Model Building Hull Planking coat of filler on the second side and was able to easily sand it off in about 20 minutes.
With both sides now filled, I have the hull a quick sanding, then did a little more Model Ship Building Hull Planking Lab Model Ship Building Hull Planking Lab Model Ship Building Hull Planking Lab patch-up work. This time I added little bits of filler to specific areas that were still problematic. I let it dry, then sanded it back down. As a final pass, I have the hull a good sanding with grit, grit, grit, and grit sandpaper.
After both sides have been sanded, filled, and sanded. Much better. It is remarkable how much better it is compared to the pre-sanding photos above. It is straight, even, Model Ship Building Hull Planking Lab Model Ship Building Hull Planking Lab and smooth. The curves toward the stern probably are not exactly as they should be, but they are close enough that nobody would notice.
Also, watch for our articles on more advanced ship model hull construction Model Ship Building Hull Planking Lab methods such as plank-on-bulkhead and plank-on-frame construction.
Plank-on-frame construction is the closest to the the method prototype vessels were constructed, but is also the most difficult and time consuming.
For this article, we are creating the hull Building Lab Hull Ship Planking Model Hull Model Planking Lab Ship Building Model Ship Building Hull Planking Lab for a 19th Century revenue cutter designed by William Doughty, the plans of which are shown on page of Howard I.
Click on the image to open the full size JPEG file, which can saved to Model Ship Building Hull Planking Lab your computer and printed on standard letter sized paper using photo-editing software. Note that the cutting patterns I have provided are simplified from the full plan used in the following illustrations to make it easier to see where to saw out the hull.
Figure 1 shows how to line up the registration marks for the two halves of the plan on a light box or window. Tape one half of the plan to Model Ship Building Hull Planking Lab the window, then place the other half overlapping the first so the registration marks line up. Once both the top and bottom registration marks are lined up, tape the second half of the plan to the window. When you are sure the registration marks are lined up perfectly, tape the two halves of the plan together where the second half overlaps the first.
Now, as shown in Figure 2, line up a metal Planking Building Lab Hull Ship Model Model Planking Building Ship Hull Lab straight-edge to the two registration marks and cut through the two plan sheets. This will remove the plan overlap so you have two halves as in Figure 3 that can now be taped edge to edge. Cut Model Ship Building Hull Planking Lab the sheer side view and waterline top view plans apart, but leave some spare paper outside the lines you will later saw to. Use a pencil as in Figure 4 to bring the section lines Model Ship Building Hull Planking Lab on each plan to the edge of the paper.
One of the best types of wood to use for the hull is basswood. It is fine-grained and carves and sands easily. If you cannot find a block thick enough for the entire hull you may have to glue together thinner pieces.
Avoid this if you can as the glue is often harder than the basswood, and causes problems when sanding. Other types of Lab Planking Model Building Ship Hull Model Ship Building Hull Planking Lab wood that will work include Poplar, Aspen, and knot-free pine, but all those are less desirable than basswood. Once you have your block of wood, make sure you have at least one square corner, see Figure 5.
Random links:
Aluminum Boats Great Lakes 2021
Flaming Steamboat Buffet Sunway Yu
14 Ft Aluminum Boat Ideas Apple
Used Aluminum Fishing Boats On Ebay Free
6 Berth Sailing Boat 4d
Categories: 16 Foot Jon Boat
