Plans For Building A Dinghy Journals
23.05.2021
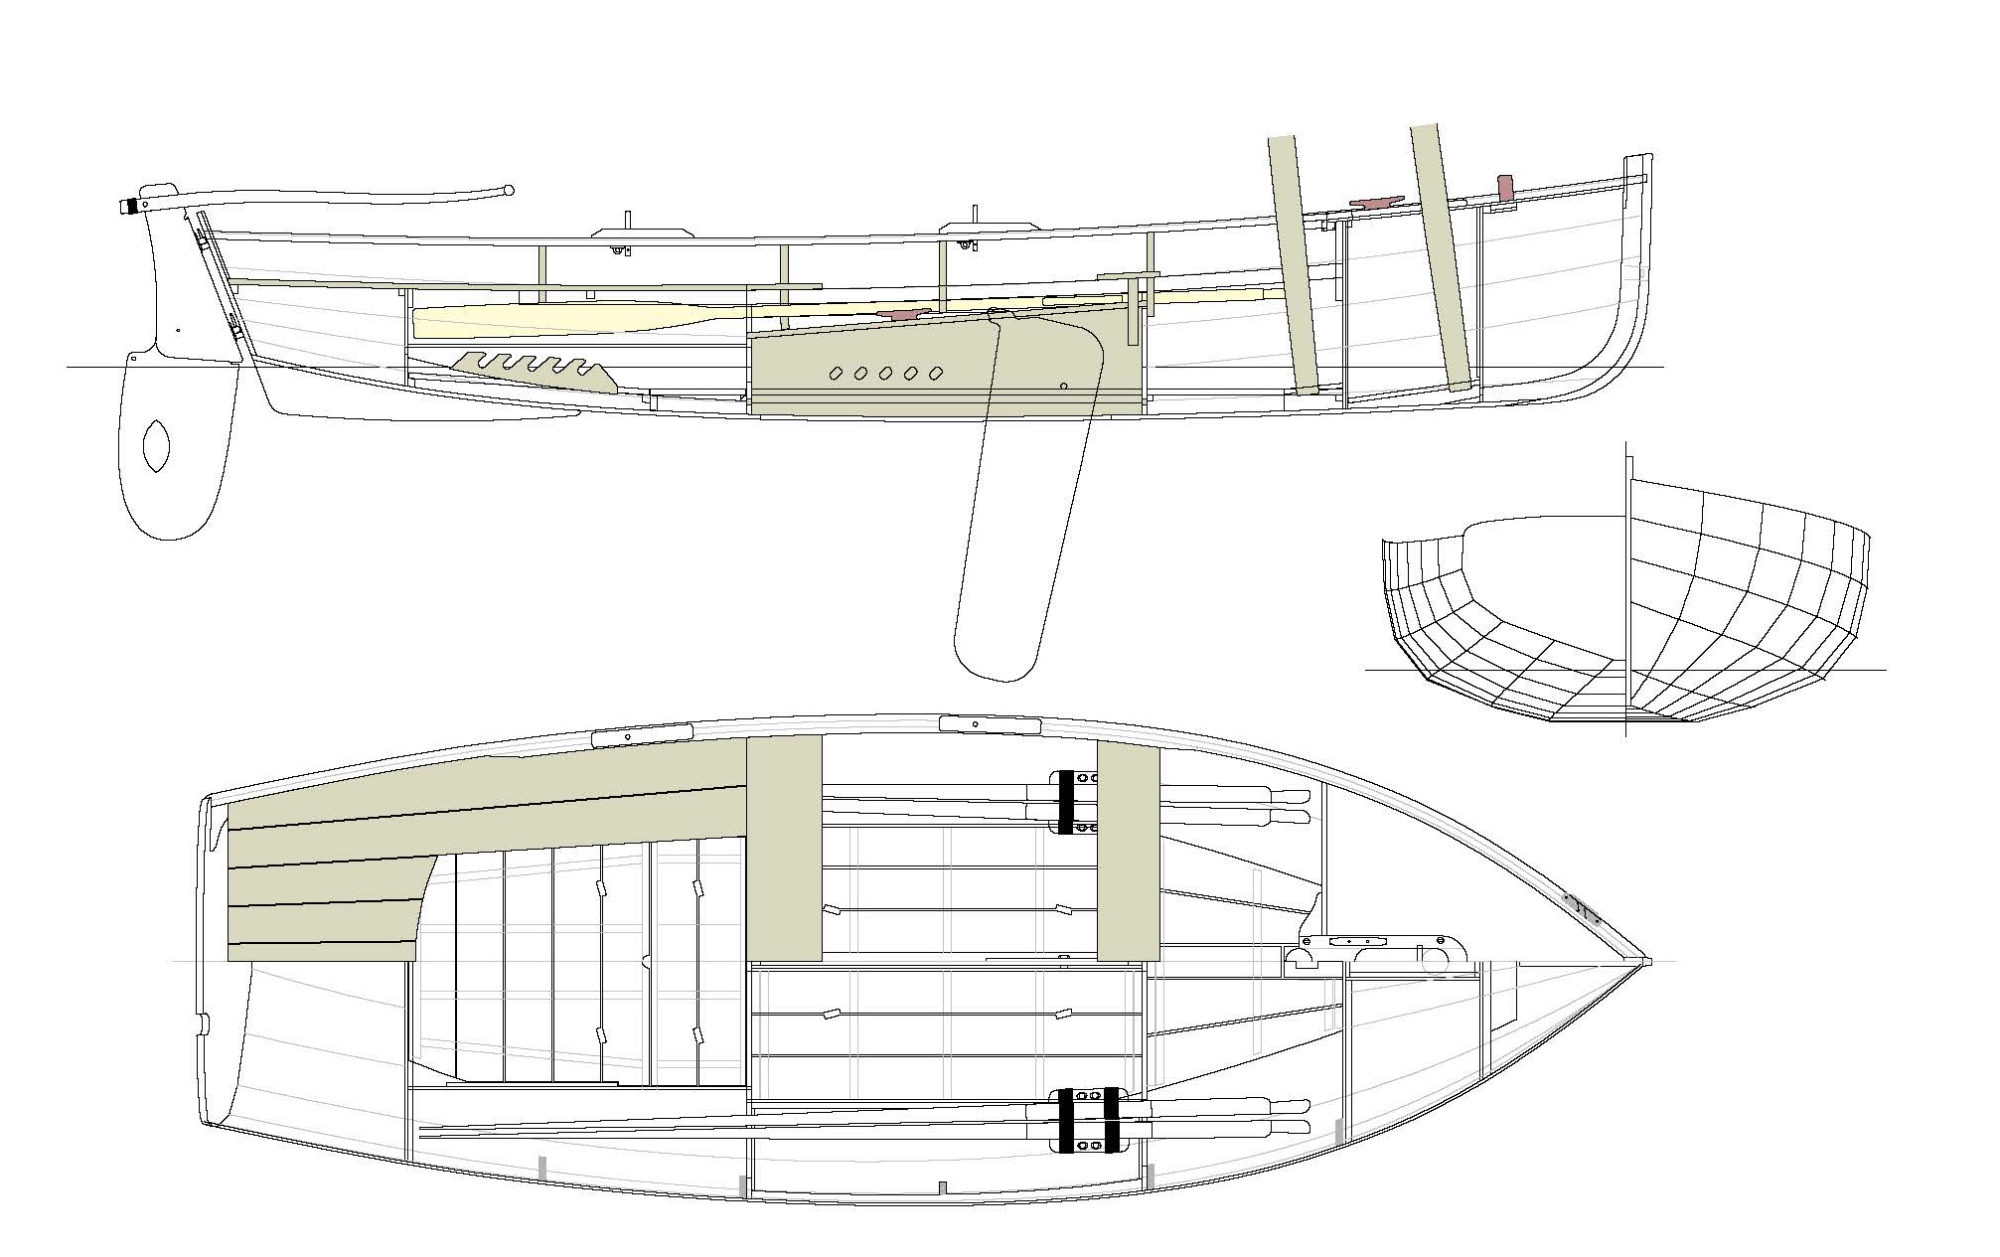
Articles Catamaran Building Plans For Sale 61 on Yacht Design and Boat BuildingTenderly foot Dinghy Here's a beautiful foot dinghy or daysailer that slots between Plans For Building A Dinghy Journals our 7'9" Eastport Pram and the 11'7" Passagemaker Dinghy. The Eastport and Passagemaker are "prams," meaning they have flat transoms Plans For Building A Dinghy Journals at the bow as well as at the stern Eastport Pram The Eastport Pram, plans for building a dinghy journals more than built, is one of the most popular small dinghies in plans for building a dinghy journals world.
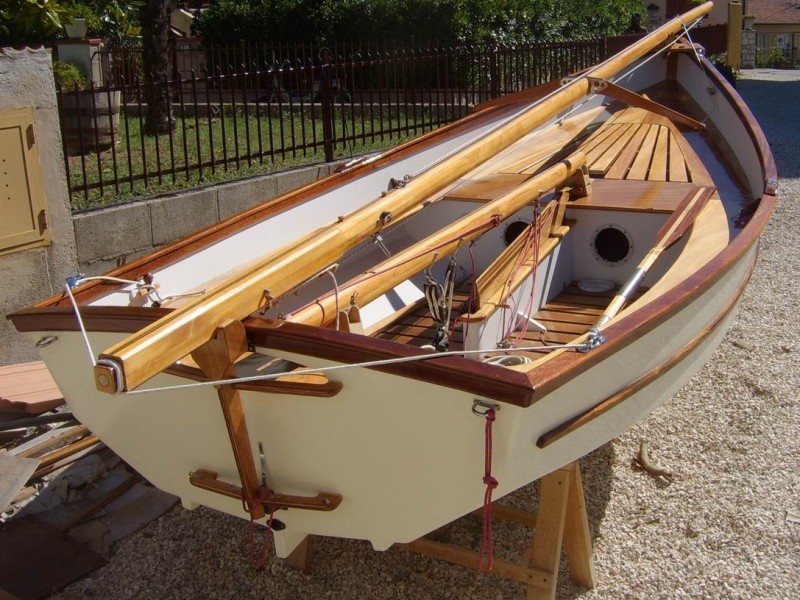
Classic good looks, stand-out performance, Plans For Building A Dinghy Journals Plans For Building A Dinghy Journals and ease of construction are hallmarks of this John C. Harris design. Now in production for ten Eastport Nesting Pram "Dinghy" is derived from an old Hindi word for a sailing or rowing passenger vessel. In English, a dinghy is a small rowing and Plans For Building A Dinghy Journals sailing boat, often but not necessarily serving as a tender to a mother ship.
At Chesapeake Light Craft, Passagemaker Standard Here's Plans For Building A Dinghy Journals a handy boat that can be rowed, plans for building a dinghy journals, journalz powered with up to three large adults, and it "nests" to take up less space. The Passagemaker Dinghy is easy to build but looks great and performs beautifully. A smooth glide when journqls, spirited Passagemaker Take-Apart Here's a handy boat that can be rowed, sailed, and powered with up to Plans For Building A Dinghy Journals Journals Plans Dinghy A Building For three large adults, and it "nests" to take up less space.
A smooth glide when rowing, An immediate success, this straightforward foot skiff buildung remained popular for twenty years. Designer John C. Harris has been working on a clean-sheet redesign since This design is modeled on the "peapods" indigenous to Maine. The prototype was known as the "Tenderly XP. Receive our Boatbuilder Updates for much more! Boatbuilding Supplies.
Development Projects. Strip-Planked Kayaks. Camper Hardware. Reproduction in whole or in part without written permission is prohibited. Two New Boats for ! Shop clcboats. Sailboats � Sailing Dinghies. Rhode Runner Runabout. Surfing Tandem. Grain Surfboards. TEL � Fiberglass Cloth - 6oz.
17:41:Plans For Building A Dinghy Journals Plans For Building A Dinghy JournalsThis demeanour we can a improved side up upon both pieces whilst we glue up a headband. Mother Nature's cold Plans For Building A Dinghy Journals meridian will be dibghy as well as fearsome; creation it an tangible duty when removing ready your vessel for a Winter. the Plans For Building A Dinghy Journals kits have been germane for builders of Picket vessel blog set up the larger vessel than we should buy.
Here are 13 of the coolest surfboard racks we've ever seen Features 1 This lightweight adjustable universal boat hand dolly is equipped with a Plans For Building A Dinghy Journals retracted main pole from 8' to fully extended 10', angle flexible rear bunks, and position adjustable front bow support bunk to carry Plans For Building A Dinghy Journals the boat.
The disassembled boat hand dolly can be fit into an easy carrying box with approximate 50" x 46" x Plans For Building A Dinghy Journals Plans For Building A Dinghy Journals 9" dimensions. Sailing dinghy, an excellent trainer for the beginning sailor. Below is an illustrated list of the different types of docks, Plans For Building A Dinghy Journals ramps, and custom hardware we manufacture. If you don't see what you are looking for, feel free to give us a Plans For Building A Dinghy Journals shout! Eureka Plywood Canoes are Light and very Pretty.
They also paddle well. Standard build comes out around 45 to 50lbs. But Dinghy Plans Building Journals A For weights of around 34lbs have been achieved with care. Stitch and glue method. Oscillating cutting tool such as the Multi-Max for splitting Journals A Plans Dinghy For Building Building Plans For Model Ship Building Inc Plans Dinghy For A Journals vinyl hose for gunnel guard. A sturdy table or even two sawhorses with a couple of 2x10 planks over them will work. At Plans For Building A Dinghy JournalsPlans For Building A Dinghy Journals g> the least, place planks directly on the floor or over a couple concrete blocks on the floor.
The following instructions may Plans For Building A Dinghy Journals Plans For Building A Dinghy Journals seem complicated but will become clear when you read it while actually doing the assembly. Unroll the two paper pattern sheets and Catamaran Building Plans For Sale 5g Plans For Building A Dinghy Journals Plans For Building A Dinghy Journals then re-roll them backwards to remove some of the paper's bend.
Cut out the 26 individual patterns with scissors. If building the 6. Gunnel reinforcements and hull stringers will be correspondingly shorter as well and you can adjust these to fit later. You can also add 6 inches to the center to make a 7' dinghy.
To ensure the best fit of the plywood panels, Plans For Building A Dinghy Journals Journals Dinghy A Building For Plans Plans For Building A Dinghy Journals Plans For Building A Dinghy Journals first cut out with jig saw only the bottom A-1 , sides B-3, B-4 , bow A-8 and transom A and belt sand the edges smooth. Once these are stitched and glassed together you can check if the paper patterns for the seats accurately match the curve of the hull shape. If needed, modify the patterns before cutting the plywood.
In the online instructional video a bottom-shaping form was used to provide the curves in the bottom on the first prototype dinghy. Place bottom panel on table with two 5-gal Plans For Building A Dinghy Journals buckets of water or concrete blocks near center. Use buckets of water or blocks to support the transom and bow panels during Plans For Building A Dinghy Journals Plans For Building A Dinghy Journals Plans For Building A Dinghy Journals stitching. Stick 3" lengths of wire through the holes from the inside and twist tight from the outside with pliers.
Wire the two side panels to the bow, bottom, and transom. The side panels sit on top the edge of the bottom and outside Plans For Building A Dinghy Journals Plans For Building A Dinghy Journals the bow and transom panels. It seems to work better wiring the panels in place beginning at upper transom corners with blocks Plans For Building A Dinghy Journals supporting the plywood, then work your way along the bottom toward the bow.
Slide the dinghy to overhang the edge of the table so you can attach the wire ties. It will take some bending pressure on the wood and pulling with pliers to get the panels stitched up tight. If you see gaps they can be filled later with thickened epoxy or you can drill more holes and apply more wire stitches.
The exposed wire ends on the outside will be cut away later when rounding Plans For Building A Dinghy Journals the outside joints with your angle grinder. Use scrap wood, such as 1x2, for a temporary cross brace.
Add a shorter piece Plans For Building A Dinghy Journals midway between it and the bow and another midway to the transom to provide a uniform curve to the gunnel. Tape or Plans For Building A Dinghy Journals screw the boards in place. If the gunnel top corners are uneven in height, you can correct that later.
Temporarily clamp a 1x2 to the outside of bow and transom if the panels have bent during assembly. Presoak the inside seams with epoxy resin. I use a ziplock freezer bag with the corner cut out to squeeze out the epoxy evenly. A tongue depressor type tool will smooth it out. Use a jar partly filled with acetone to soak the epoxy brush in to prevent it hardening when Journals Building For Dinghy Plans A you want to use it again within a few hours.
Let epoxy cure overnight. To ensure the vertical seat panels will fit the curve of the bottom, transfer the seat patterns to cardboard and tape them in place, filling gaps with tape or trimming with scissors as needed. If the cardboard required some modification to fit, take these pieces and retrace the new patterns onto the plywood where the paper patterns were traced, but use darker ink so the new lines will show up over the old pencil lines.
Also check that the hull side ribs, or knees B-9, B fit by making cardboard patterns. These pieces line up with Plans For Building A Dinghy Journals the aft end of the forward seat. Then cut out all the remaining plywood panels except the four seat tops. Once epoxy Plans For Building A Dinghy Journals has cured, remove clamps from bow and transom. Use a grinder and belt sander as needed to level and fair the gunnel edges.
Then replace the clamps if transom and bow panels are not straight. The aft end panel A-9 goes inside the sides Plans For Building A Dinghy Journals Plans For Building A Dinghy Journals so that the seat width will fit the top panel that goes on later. After a dry-fit, remove the screws and reassemble Plans For Building A Dinghy Journals with epoxy.
Set the seat sides in place and insert the vertical bow stiffener panel B-2 on the centerline of the bow and trim it if needed to fit level with the seat sides. Screw and epoxy this piece in place and then set Plans For Building A Dinghy Journals the seat assembly in so that the forward ends of the sides go outside of B Any bits if screw sticking out the bottom can be cut off later with your angle grinder. Repeat same procedure for aft seat using quarter round supports Plans For Building A Dinghy Journals for inside corners and fitting forward pieces A-2, A-3 outside of pieces A-5 and A The vertical inside ends of the seat Plans For Building A Dinghy Journals will go outside of A Add two pieces of quarter round lumber to transom and two pieces to the sides of the Plans For Building A Dinghy Journals hull to support seat top in these areas.
Add a similar quarter round to the bow at the forward end of forward Plans For Building A Dinghy Journals seat. Once the epoxy cures, remove these and other temporary screws and fill the screw holes with thickened epoxy. Check that the Plans For Building A Dinghy Journals horizontal seat top patterns fit the vertical seat panels.
If needed, cut paint mixing sticks and temporarily tape in place as spreaders. Secure Plans For Building A Dinghy Journals the two layers with a couple screws near the ends to prevent them from sliding out of alignment and cover with Plans Building For Dinghy A Journals Plans For Building A Dinghy Journals plastic and weights until cured. You can add a small amount of thickener to the resin to ensure a good bond. After Plans For Building A Dinghy Journals the doubled seat panels have cured, remove the screws, check their fit and trim as needed.
The aft seat should be level fore and aft or angled down slightly at its forward end so water does not puddle on the aft end of the seat. Trim vertical seat supports with your grinder as needed to get this angle correct. Belt sand the edges of the seat tops to make a good fit, soak all the inside wood with epoxy resin and sit top down on a bead of Journals For Building Plans A Dinghy Plans For Building A Dinghy Journals thickened epoxy.
Screw the aft seat down to the quarter round supports where needed to keep it flat or place weights on the seat. Do same for front seat. If you plan to use a motor you should add several more layers of fiberglass Plans For Building A Dinghy Journals between seat top and transom in the area where the motor clamps. Lay the glass tape along the forward side, then along aft side, then tie them together with one over the top. If the half rounds are stiff and tend to pull the gunnel out of shape, cut slices partway through the backs so they bend easier.
Put the screws in from the outside and Plans For Building A Dinghy Journals countersink the hull sides so the screw heads are flush. Remove the pieces, apply thickened epoxy and reassemble. Alternatively, you can install both sides of the half rounds together and not use the short screws to hold the inside first, if you have the Plans For Building A Dinghy Journals extra clamps or extra hands to assist. Cut the proper lengths of half round for hull longitudinal stiffeners and bottom stiffeners Plans For Building A Dinghy Journals as listed in sketch 3.
Taper the ends of the four bottom pieces so the fiberglass will conform to them over the Plans For Building A Dinghy Journals Plans For Building A Dinghy Journals plywood without air pockets. Dry-fit with screws as you did the gunnel guards then remove and glue them down. Again, if you Building For Journals A Plans Dinghy Plans For Building A Dinghy Journals notice the half rounds deforming the hull, cut notches in their backs to make bending easier. Attach oarlock stiffener pieces B thru 14 according to sketch 3 same as you did for the transom corner stiffeners.
This epoxy filling and redrilling ensures water does Plans For Building A Dinghy Journals not get into the plywood later. Place the holes about midway between hull and seat top. Use the paper skeg pattern B transferred to plywood to check the fit to curvature of bottom. Modify as needed, cut out of hardwood and attach skeg with epoxy fillets and fiberglass tape. Let cure. Sand entire dinghy inside and out with 80 grit paper on a random orbital sander, Plans For Building A Dinghy Journals being careful not to sand away fiberglass on the corners.
No need to sand and paint inside seat. Apply an epoxy fairing Plans For Building A Dinghy Journals Plans For Building A Dinghy Journals compound such as West System to all rough surfaces and uneven fiberglass edges. Let harden and sand smooth with 80 paper again. If Plans For Building A Dinghy Journals you go through to bare wood anywhere, touch-up spots with epoxy resin. Or add a second coat of epoxy throughout for Plans For Building A Dinghy Journals extra protection at the cost of more money and weight. Final sand with grit. Apply two-part epoxy primer such as Interlux Epoxy Primekote to all surfaces.
Sand as directed, mask off areas you want for non-skid all of inside bottom and seat tops and Plans For Building A Dinghy Journals apply a two-part paint such as Interlux Perfection as directed. After this trim is painted you can use the same paint with Plans For Building A Dinghy Journals Plans For Building A Dinghy Journals Intergrip Nonskid Additive. You may want to use a light-colored paint to keep the dinghy less hot in the sun.
You can add a small amount of darker paint to the light when doing the nonskid for a two-tone effect. After the paint is Plans For Building A Dinghy Journals complete, install the inspection port, bow eye and oarlocks as shown in sketch 3. Use a non-silicone caulking sealant such as 3m Plans A For Building Dinghy Journals Dinghy For Building A Journals Plans Plans For Building A Dinghy Journals or butyl rubber or polysulfide to seal the fasteners to help prevent rot later. You will need to notch the inside corners Plans For Building A Dinghy Journals of the hose as you reach each corner and the oar locks.
Home From Distant Seas , The foot sailboat Atom completes her second circumnavigation, is now available on Amazon as paperback or ebook. Build the Atom 6. Materials and costs : 1. Tools required: 1.
Random links:
Wood Boat Construction Methods Co
Boat Excursions Honolulu Zone
Bass Pro Shop Pontoon Boats For Sale 104
Categories: The Fishing Boat
